It's on the market!

It's official. We listed our condo for sale! Wooty woo!!!

Here's the flyer we put together.
We also listed our property online here...


And here!

 
Is it sad that we had to take pictures with my husband's phone, which has an app that stitches pictures together, because my super duper fancy camera only has a standard lens and it would have taken twice as many pictures to showcase all the features of our rooms? I really need a wide angle lens. Certainly not going to buy one now because we need to save all the moolah we can!

I have to admit, it is really nerve-wracking posting our home for sale. I know I post pictures of our home on this blog but now, you know exactly where I live. It's frightening but necessary. Please don't stalk me. Unless you want to buy the place. It which case, I'll bake cookies when you come over.

It feels so great to finally have this done! And now.....we wait......and hope.....*gulp*......
3

Under Construction

I'm making some changes and updates around the blog. I added a Projects Page (with the tabs at the top of the blog) to make it easier to see all of the projects I've done since starting Zodirowe. I want to add an Organizing tab too. I love those tabs on blogs and I think I need some of my own. I'm also planning on cleaning up my labels, probably making categories instead.

So, don't be surprised if things look a bit wonky for a few days. I'm still learning and trying to improve! Please bear (or is it bare?) with my while I try to better the ol' bliggity blog. I could probably start by never saying bliggity blog again.

Yeah, like that would ever happen.
0

Turning Napkins Into Pillows

I have a problem with pillows. I think my family will commit me to rehab soon if I don't get a handle on things. I even posted a question on twitter.

This is titillating stuff, I tell ya.


My family hasn't sent me away yet, so I think that means I can make a couple more pillows. Wouldn't you agree? Don't answer that. Just indulge me. Then commit me.

While cruising around Target's website for something (I can't even remember what exactly, probably more pillows), I came across these napkins with my favorite shape on them.

Via here. $10 for four. Qua-trefoil is my favorite shape, in case you didn't get that. 


Target isn't selling the napkins on the website right now. I swear I bought them a little over a week ago. You could check your local Target for availability, although mine has lied before. Well, the tutorial works for any type of fabric napkin so you could find another pattern. If you really like the pattern though, may I suggest the tablecloth?

Anyway, the napkins are also in a nice bright yellow, which is my new thing apparently. I thought this fun, bright pattern would make a great addition to our living room. So, into my cart they went. Along with the matching runner and some other fun stuff, such as a pretty gray runner. I sure know how to live it up.

I used the same basic tutorial from Budget Wise Home (see it here!) that I've used on countless other pillows, with just a few tweaks to fit my budget/needs. You see, the tutorial on Budget Wise requires one panel of fabric to be 19x19 and two panels to be 14x19. Your average fabric napkin is about 20ish x19ish. I wanted to make two pillows but I didn't want to buy another set of napkins. I was trying to keep my cost per pillow cover at $5 because I'm a cheapo. Spoiler alert: It's still totally doable.

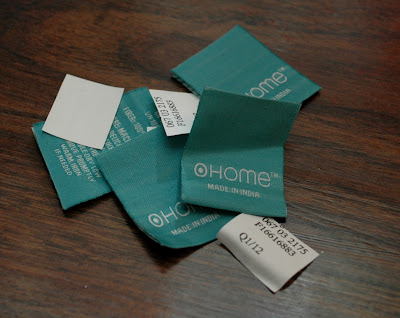
First things first, remove the tags from your napkins. You don't wan't the lovely blue of the tags peeking through the fabric and messing your whole these-totally-aren't-napkins vibe you want to acheive.


Then, iron your napkins so you won't have any funky creases and your measurements will be more exact. Next up, measure your napkin to find the longer side. Cut the longer side in half. In my case, the longer side was right about 20 inches so I cut one napkin into two 10x19 inch panels.


Next, take a second napkin, find the longer side, and mark it at 19 inches. This is where you want your two pillow sides to meet. I had about an inch of extra napkin fabric that I just cut off, so I wouldn't mistakenly attach one of my 10inch panels to the edge and have a big gap in the middle.


Take your whole napkin and lay it pattern side up on your ironing board. Your going to make you pillow inside out so you don't have to worry about pesky seams. Place one of your cut napkin pieces pattern side down on top of your whole napkin, like the picture above.

Tip for you, position your half napkin so that the finished edge is towards the middle. Normally, you would hem all sides of your fabric when making a no sew pillow but, with napkins, you don't have enough length for that. You need every inch you can get. By putting the finished edges in the middle, you don't have unsightly edges!


Using thin, heavy duty hem tape, iron your pieces together. Take your other piece of cut napkin and repeat the process on the other side. You should have a little overlap between the cut pieces.

Be sure to flip your new pillow cover over and iron the other side as well. This ensures that the hem tape will adhere completely to your fabric so it will be nice and durable. Once it's all cool, turn your cover right side out. Bingo, you have a pillow cover!


I will give you the heads up that, sometimes, the back gapes open. It isn't a big deal to me because the pillows face forward and look fine. Fantastic even. If it becomes an issue for me, I will either attach some velcro strips to the inside of the opening (so I can still switch them out) or maybe I'll even get crazy and sew a button on there. Did I mention I'm a wild woman? Button sewing! So crazy! I'll let you know what happens.

I put my new napkins pillow covers over some dark red pillows we already had on the couch. It's spring/summer and it's time for the dark colors to hit the road. For now. This also means that I didn't TECHNICALLY add any pillows to the couch. I merely recovered some pillows, which is completely acceptable and means I DON'T HAVE A PROBLEM IT'S COOL YOU GUYS NO NEED TO COMMIT ME.

Ok, so all of those caps lock letters would beg to differ. Time to distract you, look pillows!


I think they look rather happy on the couch! Husband gave them his approval when he said they were actually quite comfortable and soft. He supports my habits. I'm a lucky addict, I mean gal.
0

New Dining Room Chairs

After slapping on a fresh coat of neutral paint in the dining room, the space was looking a little bland. Ok, really bland.

This was before the lighting switch I blogged about here.
I've always wanted to recover our dining room chairs but haven't been sure what fabric to use. Traditional pattern? Modern? Color? Neutral? Ah I couldn't commit! However, with this very bland dining room, my need for some color helped me narrow my options. I needed some punch/pizzazz but nothing too crazy. I didn't want to feel the need to match my table linens to my chairs. I'm crazy like that.

So I dug around on my favorite discount fabric site, fabric.com! I love that site. They have a great mix of styles and have the lowest prices I can find. Before you ask, no I'm not being paid or perked by the site. I wish.... I genuinely love this site! I found this lovely pattern called Waverly Square Root Sterling.

If you like this pattern, get it here!
I think the yellow and gray combo is the right mix of fun color while still being kinda in the neutral family. Plus, I think that's a trendy color combo right now. Or maybe that was last season? I've never been great with trends. This pattern comes in a pink and orange combo, blue and green, and a black and gray mix. Those links aren't all from fabric.com. Sometimes fabric.com has them in stock, sometimes they don't.

After I got my fabric in the mail (side-note, isn't receiving a package in the mail an awesome feeling?), I was excited to get started. I used my nifty new screw gun to remove the seats from the chairs.


We bought ours from Lowe's and it's been working out well. It is not the most powerful drill but it has awesome battery life and works great for little projects like this. I imagine it would be great for assembling furniture too.

There are about a million chair recovering tutorials out there, so I won't get too detailed about each step. It's pretty straight foward.

1. Cut a piece of your fabric that will fit around your cushion with some overlap.

2. Iron your swatch of fabric so you don't have any annoying creases in your seat. That would not be fancy.

3. Place your seat cushion face down on top of your fabric, making sure you center it with enough overlap to go all the way around. Always check before you staple because it just makes life easier!

4. Put one staple in on one side.

Putting your first staple in the center is your best bet.

5. Then, pull the fabric taut from the opposite side you just stapled and add a staple to that side. The trick to get it right is pulling your fabric nice and tight, but not so tight you strain/rip the fabric.

Can I tell you how difficult it is to take picture and staple at the same time? IT'S HARD YA'LL. Which is why I'm not actually stapling at this moment. That's right. The shot is staged. It's all fake! Smoke and mirrors! The cake is a lie!!
6. Keep stapling around the seat, switching to opposite sides and pulling the fabric taut. Don't hesitate to flip the cushion over the check the state of your pattern. Remember, it's much easier to take out five staples instead of fifty!

7. Once you fabric is stapled down, just reattach your seat to your chair and prest chango columbo, you have a new chair!


I timed it, by the way. It took my 5:09.5 minutes to recover one chair, with no picture taking and one stop to break up a cat and dog fight. If you hate doing math and trust mine (which is not a great idea but I get it you're brave), it took me less than 30 minutes to do four chairs. I added some time for blogging and refereeing.

I love a good before and after!

*yawn*

*yay!*
I think the dining room is looking much brighter and happier!

Except that these pics were taken at night. Details, details...
I also picked up this new gray runner and a yellow one from Target.com because, apparently, I'm on a gray and yellow kick.

I'm adding more color and brightness to the dining room soon by way of new fabric for the bench cushions. I can't wait! It's sooooo pretty, kids. And I just waved my freak flag by become giddy about fabric. Oh how far I've come.


2

Stop the Search Party I'm Still Alive

I guess, since this is a DIY blog and all, I could post something DIY related.
Even though I haven’t been posting DIY stuff (what will all of the pets and anniversaries and whatnot), I promise you that things have been going on in Casa Comeaux of the home improvement variety. Husband and I have been wrapping up some projects around the condo because we want to put it on the market ASAP. We keep seeing homes go on the market and we’re like, OOooOO! Look how pretty! Too bad we can’t get attached because it will probably be sold before we can even list our place!
You may think we’re being dramatic but that exact scenario has happened to us a few times already. Husband has shown me listings to ask what I think about them and I tell him, I can’t fall in love again. It hurts too much.
We’ve been working non-stop to whittle down our list. We had a couple of weekends where no progress was made, even though we worked our buns off. The beginning of April was a very frustrating time for us. So frustrating that one weekend I just crapped out. I did nothing. I felt like nothing. I laid in bed most of the day on Saturday and felt very blah. There is no better way to describe it other than…blah. Do you ever get that way? Do you just gas yourself out so that you have nothing left to give? I couldn’t even blog, even though there were things to blog about because, did I mention we were always working?
Well, now we are on the other side of our to do list (meaning more things done than to do) and things are looking up! So here’s a little wrap up of what we’ve accomplished to help keep me motivated in these last few weeks. These kinds of posts help remind me that progress is being made and helps with my blahs. These are just a few things little things we’ve done to the condo.


We patched a hole in our wall. I won’t go into details about how the hole came about (for Husband’s sake) but we required some plumbing work in the kitchen a long time ago and we took a long time to fix the hole. The hole is under the built in desk in our living room and behind Ty’s kennel. So, it wasn't visible at all. Out of sight out of mind, right? Potential buyers may not agree or like having a giant hole in their living room so it had to be fixed. Husband’s friend, Adam, came over and showed us how to do a floating patch. It’s a fairly easy process.
This is Adam. Everyone say hi!
You take a piece of drywall and mark how big your patch should be. You want to make these marks so that this square will fit easily inside the hole. You may even want to cut your hole in the wall a little bigger or straighter to make floating the patch easier.

Next, you need to make a second set of marks about an inch or so outside of your initial marks. This is going to be your “tape,” I guess you could call it.
Here's a little diagram from Adam to help illustrate your marks and what they do.
Using a saw, cut out the larger square. Then, using a box cutter or exacto knife, cut through the drywall paper on one side of your smaller square. Likea so…

Once you make these cuts, you can break and peel off the drywall bits while still leaving the tape.

This is what you end up with.


Then, you use some mud and the drywall tape to float the patch inside the hole. You want to apply mud a little farther out than your patch so you can blend it in more easily. Smooth out the mud as much as you can so you can do less sanding later on. Please note, this patch will not be strong enough for hanging a picture or shelf or anything. This patch works perfect for this spot though. I don’t plan on putting any pictures down there.
Ty wants to become a DIY dog so he's learning the ropes.
Once the mud fully dries, you can lightly sand and paint it. Be sure to paint farther out from your patch to help it blend!
Can't even tell! Except for the missing molding, which is on the To Do list.
Viola! All done. Thanks Adam!


Some other things around the abode include:
·         Putting a fresh coat of paint on the patio furniture.

I originally posted about all of the work we did here but some cracking and peeling had occurred since then. I wanted everything freshly painted so the patio wouldn’t look cracked or peeling. I even sanded and primed the loungers! Yay for proper prep work!
I mostly did these extra steps because I got a hand sander for Christmas and was dying to finally try it out. Whatever works, eh?


·         We finally fixed Husband’s closet doors and cleaned the junk out. It still needs a little sprucing up but it's a big improvement. More details to come!


·         We fixed a hole in our ceiling.
I promise it came out better than this.
Yet again, more holes. I promise our condo isn't falling apart. This was another hole that hung around for months before we finally fixed it. I may post more in-depth about this project because what should have been a quick fix, took several weekends to finish. Ack.

·         I painted the cabinets in our bathrooms. Same color, just a fresh coat. The cabinets had some chips and dings but nothing a fresh coat of clean paint couldn't fix!


Freshly painted cabinet in our half bath!


Refreshed cabinet in my bathroom!


·         We changed out our dining room light.


The Before
Our previous light was off center and really low. It drove me crazy. Not only did it look off, but anyone over 5’9” would run into it. I would give you a step by step tutorial about how we changed out our light by ourselves but I can’t. Because the entire time we were working on it, I was like this:
Via here
Yeah I had no idea what was going on. Husband has messed with electrical stuff before but even he was confused. Turns out, these were “easy” installation instructions and we were thrown off. And by we, I mean Husband had never seen anything like it before and I was useless. Seriously, at one point, Husband looked at me and said, “Quit just standing there and hand me the screw driver.”
That might seem harsh but I was no help whatsoever.  Zip zilch NADA. I actually got in the way a bit.
Even though I took pictures of the process, I don’t feel comfortable trying to give anyone any kind of instructions. Although our house hasn't burned down, I’m still not confident about what I learned. It’s cool though because we have fire monitoring at home.
I’m happy with the results though! This may not be the light fixture I would choose for our forever home but it will certainly do for our let’s-just-list-the-damn-place-already home.
 It's also the closest match to our existing fixtures, which we are not about to switch out.

·         I changed our entryway to look more like an entryway. Our old set up worked ok but never great for me. It also didn’t look like your standard entryway.

I thought a bench would be the best way to show, hey you CAN fit an entryway in this dining room. I found this awesome one at Bed Bath and Beyond for about $80 ($64 with a coupon!). It has three cubbies and two lift up seats with more storage.

I also picked up a hook rack for coats and such. I really like our new entryway and it’s easier for me to toss my bags on the bench and they still look neat. I plan on recovering the cushions so the room isn’t so beige. I know we wanted this room to be more nuetral but there is a limit for us.
I just ordered some bright and fun fabric to cover the cushions. I can't wait to share the results!


That's just some of the stuff that has been going on while I took an unintentional blogging hiatus! Those seem to happen a lot lately. Don't judge.
3

Happy Anniversary, Husband!


Today marks two years Husband and I have been married. Shocker, no?

I kid, I kid. It's pretty easy to be married to someone as awesome as Husband. Here's a little list of just how awesome.


He's very supportive and helpful of my many, many crazy ideas.


Here he is helping me finish the canopy for our
patio after I was ready to give up.


He's an animal lover, just like me. He's great with the Kids.


He's funny as hell and constantly cracks me up.


I can tell by the way he looks at me that he adores me, which is always nice.


He puts up with my crazy antics.


Recognize this from the blog header? It
kinda sums us up. Me = goofy. Husband = Oblivious Cool with
it.


I can't help but go gaga for that smile.

Sorry, I just turned into mush. So.
Damn. Handsome.

He helps make our house a home.

He's also (among many other things) sweet, loving, and genuine. Oh, and he's my sugar daddy. And looks great without a shirt on. But, I can't show you that because then you would all be knocking down our door and I don't like competition.


So, to my amazing Husband. I love you more than anything. You are so special to me. You are my partner, my best friend, and my soul mate. You make everyday a little brighter, just by being you. You make my world go 'round. I don't think I can ever thank you enough for all that you do. But, I promise to try. I love you, my Wesley! Happy Anniversary.


I promise to go back to our regular programming and cut out all this mushy stuff. Eventually. 
0
Back to Top