Recycled Bracelet Holder

While supply hunting in Michael’s, I came across a bracelet holder that I thought would be perfect for organizing my ever growing cuff collection. My previous system was a bowl and a tray in my closet (seen here) which was great. For awhile. As my bracelet collection grew (I do love a good cuff) it became harder to dig around for the right bracelet and some were lost at the bottom of the bowl. Which is crazy because it’s not that big of a bowl.

When I saw the bracelet holder, I immediately picked it up. I noticed that it was so light, it was nothing more than a cardboard tube with velvet covering. It was only $7.99 but I am such a cheapskate. The tube was about the size of a paper towel roll and a lightbulb went off in my head.

Source here.


You see, Ty loves paper towel and toilet paper rolls. When we get to the end of a roll, he gets all excited and hops around until we give it to him. He loves to tear them up and eat (some) of them. Cardboard is fiber for dogs, right? My mom will save a bunch of her rolls to give to Ty, like a treat. Needless to say, I have a ton of cardboard rolls.

To make your own bracelet holder, you will need:


  • 1 paper towel tube
  • 1 toilet paper tube
  • 1 cardboard square
  • About a half of a yard or so of fabric
  • Some paper of some sort. I pulled some fliers from the recycle bin.
  • Double sided tape


I cut off a box flap for my cardboard square. The box also came from the recycle bin. Yay for being green! This piece will act as the base, so make sure it is wide enough to keep your jewelry roll from tipping over.


I checked to see if my paper towel roll would fit inside my jewelry cubby. It was a little long so I cut off one of the ends. This step isn’t necessary; it just depends on where you plan on keeping your bracelet roll.

First, I traced the outline of my toilet paper roll onto the center of the paper towel roll.

Ok, center-ish.


Then, I cut out the circle of the paper towel roll. The idea is to fit the toilet paper roll inside the hole to create the T shape. I took a few tries to get the hole wide enough. It’s best to do a little at a time.

Like so.


Once I had my T made, I stuffed the entire contraption with paper. This makes the recycled jewelry roll more substantial and sturdy.


Once I was satisfied with my stuffing (hehe, yes I’m twelve), I used some double sided tape to attach the T to my cardboard square. You don’t have to use double sided tape, but it will make it easier when you’re wrapping the holder.


This will be the end result!

Well, almost the end!


I used some leftover cream colored fleece fabric to wrap the bracelet holder. You could probably use scrapbook paper as well, if you prefer.  I had to wrap in sections. I started with the base. I cut out a square of fabric slightly larger than the base. Then, I cut a slit halfway to the center of the fabric swatch. Sounds complicated but it isn’t at all.

Create a little Y with your slit.


You could also trace the circumference of the toilet paper roll, but I had already attached it to the base. And I’m lazy.  It all comes out ok in the end. Promise!

Next, I covered the bar portion. I folded the ends like a present and used double stick tape to secure them.


Lastly, I took another piece of fabric cut to size, folded the ends so I had an even seam, and covered the toilet paper roll.

And that’s all she wrote!


Here’s my new bracelet holder in action. The sides are still a little long but, look! I have bracelets! This project was made from recycled items so it’s nice and green. And free! Woo to the hoo. It isn’t designer, by any means, but it’s hidden in a closet and the pretty bracelets cover any blemishes. Or so I tell myself. So far, it has been working great! However, if it doesn’t fit my organizational needs, it is no big deal. I still have the tray and bowl!


How are your projects coming along? Have you ever copied something, even though the inspiration was cheap?
7

From Dining Table to Couch

Husband is a big fan of brown/neutrals so pretty much everything was plain brown when I moved in with him. Except his dining room, which is bright red. Slowly but surely, I’ve been introducing more color and pattern into our home. Don’t get me wrong, I love neutrals and I loved the way Husband had his condo decorated when we were dating. It was a big selling point in marrying him. Sad but true. As my Mom would say, he’s got good taste; he married me. However, I like a little color and reading blogs has opened my eyes to the wonder of patterns and textures.

One area in desperate need of some more pizazz was (ok still is) the living room, specifically the couch. It is a big brown sectional, aka a big brown spot in our living room. Ok, that sounded wrong. It made the living room feel even more plain.


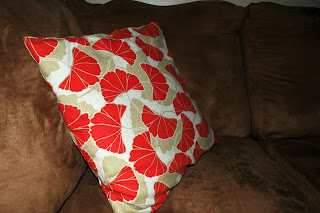
I added a couple of soft red pillows. I also made a pillow from some leftover fabric from my folding chair makeover. I did a simple no-sew pillow cover from this tutorial from Budget Wise Home.  


Better but still lacking. Sarah from Thrifty Décor Chick made some couch pillows from placemats and that got my mind working, which explains the burning wire smell. I had seen these really cool placemats at World Market. Every time I went to the store, I found myself drawn to these placemats. I loved the pattern but I couldn’t justify getting them when I knew I would rarely use them. I’m too short on storage to buy things just ‘cuz. I mean, I do buy things just because but I’m not supposed to do that. Sarah’s repurposed pillows were the perfect way to have my placemats and eat them too! Wait, that doesn’t make sense. 

The placemats are reversible but my favorite side is the one on the table runner. Source here.

The placemats are sold individually in the store for about $4.00. I also found a cool red, white, and blue patterned placemat in the clearance section for $2.00. That one isn’t available online any longer. Probably why it was on clearance.

 I ended up not turning the blue one into a pillow. It wasn’t double layered like the others, so it wasn’t as easy. Forget that.


I used a seam ripper to rip out the seams on one side of each placemat.


Then I stuffed a travel sized pillow and a little extra stuffing into the placemat. The extra stuffing may not have been necessary but I didn’t want wimpy/saggy pillows. I only added about two small handfuls, to fill in the corners mainly.

From Wally World for $3.00.

 I went to my mom’s house to borrow her sewing machine, because I don’t sew enough to get one. I just use hem tape. I thought about using hem tape with the pillows but, why not try my hand at the sewing machine? To my surprise, when my mom saw what I needed to do, she swore that it would be easier to stitch the pillow by hand. I thought she was crazy but, momma knows best. As it turns out, she was right! It was easy!

We used a blind stitch, because it can’t be seen. I thought it meant I was going to go blind because OMG I’M SEWING BY HAND. HAVE I GONE BACK IN TIME?!?! Ok, it wasn’t that dramatic. I don’t have any pictures of the process because I forgot to take my camera. Bad blogger! Here are some up close shots of the finished stitch.

This is how it should look. The seam should be invisible. This is the pillow Mom sewed. Thanks Mom!
This is my pillow. Yeah. . . I had some issues at first but I eventually go the hang of it. I sew like I iron, which is terribly. Sorry Mom. I know you tried.
  
Here’s the finished product on the couch!


The red, white, and blue pillow has already found a new home in the office. Husband took my desk chair pillow so I needed a new one. It might be relocated again. The batik pillow is definitely staying here though. Even Husband digs the pattern. Hurray for progress!

This is how it normally looks, with the blankets on the back of the couch. I get cold very easily and need to have blankets  within easy reach at all times.

The living room still needs some more pizazz but, we’re getting there. I know my home isn’t “magazine worthy” but I’m ok with that. I’m building a home with my family that we feel comfortable in and love. And I’m having a blast getting there. I sometimes get swept up in thoughts of having a “finished” or perfect home but I have to remind myself that it isn’t about that. Home is about creating and sharing memories with loved ones, having a sanctuary for yourself, and surrounding yourself with people and things that keep you happy. And that’s what I think I have here. In reality, our home will never be truly finished until we’re done living in it. And by that I mean when we’re dead. Yeah, I can’t get too mushy for too long. It’s just not how I roll. Word, yo.

Did you hear that? That was the sound of Husband (and maybe my mom) rolling their eyes because I said word, yo on the Internet.
5
Back to Top