I had planned on doing a post about our patio makeover after I posted our DIY canopy, but (alas!) the weather has been rainy and gray for the past two weeks straight. It’s supposed to continue for all of next week as well. Not even exaggerating.
 |
| Not exactly outdoor photo friendly weather. Source here. |
So, as much as I know you’re all waiting for my patio makeover post (Hello? Anybody out there?), my OMG-I’m-so-happy-with-this-project desk makeover will have to do.
As mentioned in my family post, Husband has a YouTube channel here. He posts video tutorials and reviews for Droid X mods (plug!). He’s been making more videos and having success with the channel. I think it’s wonderful he’s found an outlet for his love of all things Droid X, mainly because he’s stopped talking my ear off about it. He says the same thing about me and my new blog.
With this new project, Husband needed a dedicated workspace. In an effort to make space for him, I started to hunt for a new desk for myself. I know it might make more sense to make a new desk for him but I have been looking for the perfect excuse to get a desk and this was it.
 |
| I blame this guy. |
I was inspired by this post from Manhattan Nest. Daniel, the wonderful and talented author, used a nightstand he found curbside and made a gorgeous desk. Unfortunately, I had yet to find anything useful on the side of the road, by the dumpster (like my chair), or even a thrift store.
A few weekends ago, I went shopping at my favorite local spot, Goodwill. As luck would have it, I found something even easier than a nightstand to turn into a desk. An already built desk!
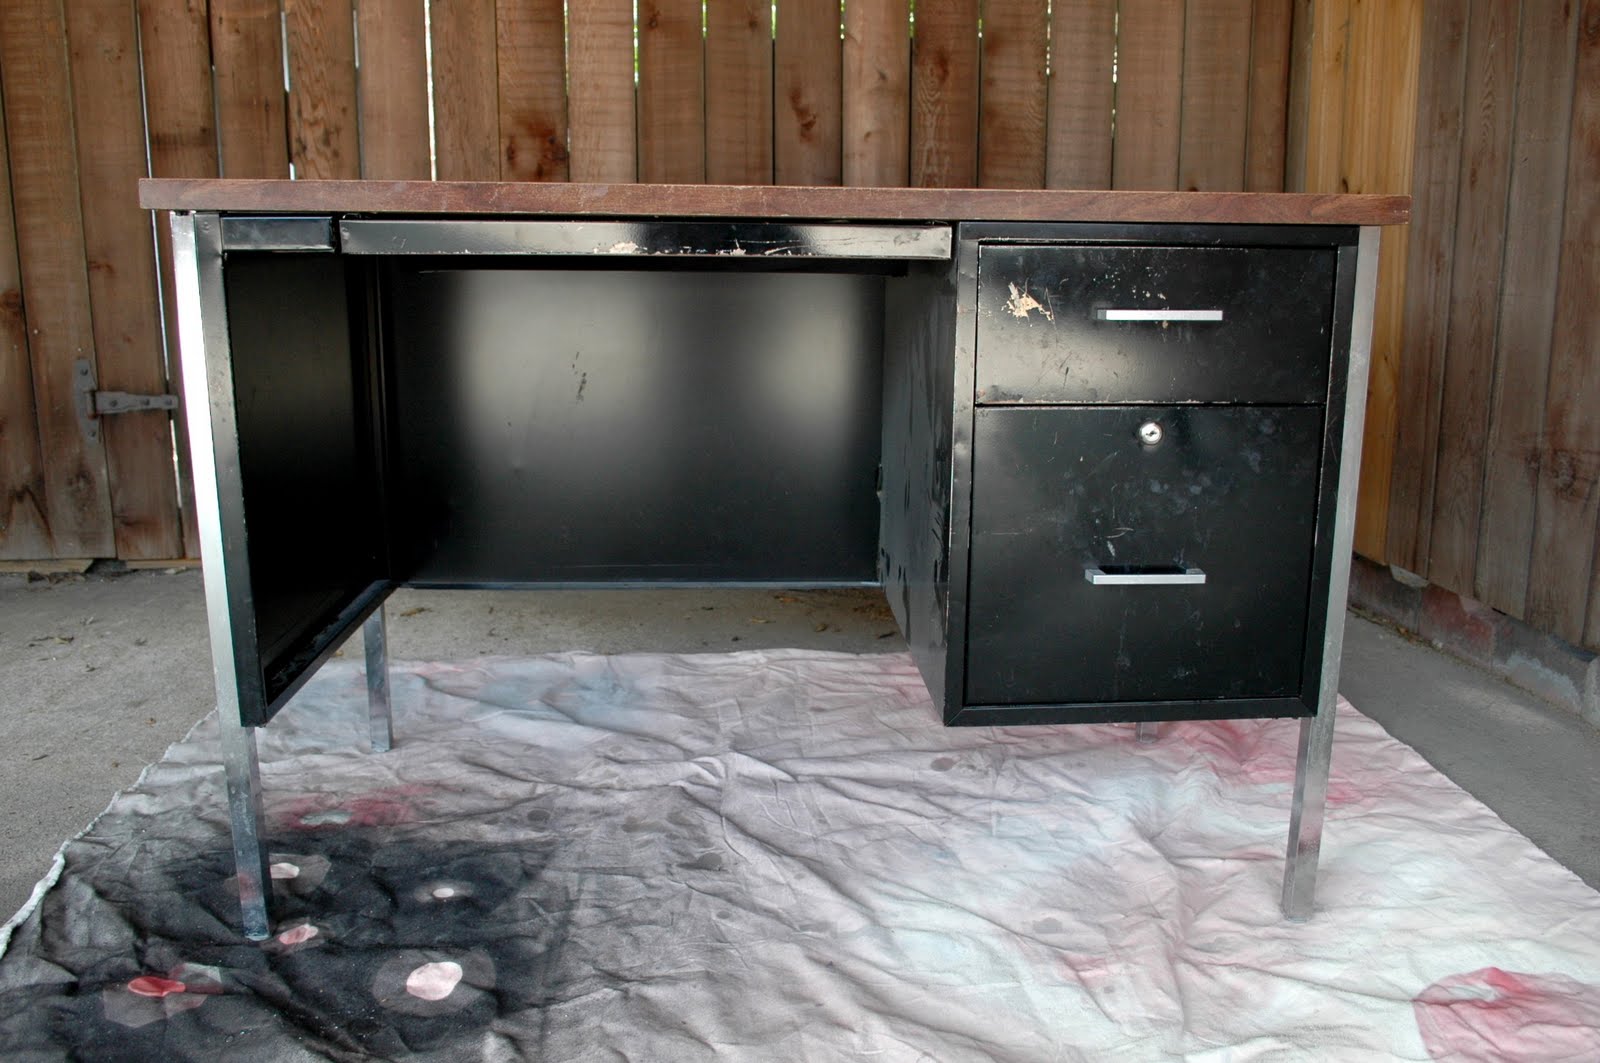 |
| This should do it. |
I loved the simple lines, the number of drawers, and the large work surface. It had a few scratches and dings, but nothing too intimidating. It seemed sturdy enough. Here are some more before pictures.


 |
| It even came with office supplies! |
 |
| My supplies. |
I couldn’t wait to get started on this project. First, I cleaned out those icky desk drawers and I believe I was the first person to do this in about twenty years. There was an unmentionable sticky substance all over the inside of the two larger drawers. There was also a plethora of pens, notebooks, paperclips, peppermints (from long ago), and smelling salts.
 |
| Still not exaggerating. Rabenhorst is our local funeral home. |
 |
| Ick. |
Here’s where I should tell you I primed the desk. But I can’t because I didn’t prime the desk. I thought I had grabbed some spray paint that included primer but, apparently, I no read good. My lack of primer required another trip to the store for 3 more cans of spray paint. So, this painting process took all damn day. Will I ever learn?
Even though this wasn’t a nightstand, I still wanted the two tone look like Daniel’s desk. I loved the white/wood combo so I was keeping the top “wood.” The laminate top had a few scratches, so I used a wood touch up pen to fix them. After you run the pen along the scratches, just buff it a bit to take off the excess ink. The sides were a little damaged too but I knew some paint would make those disappear. Plus, prying off the veneer on the sides was going to be a pain. Paint covers all blemishes. That’s why women wear makeup, right?

I also wanted to leave the chrome legs to keep a little of the shine. I taped off the legs and the top of the desk, then got to work spray painting for the rest of my life.

After many, many, many, many, many, coats of white spray paint, I noticed the color coverage was even but the gloss finish was splotchy. I tried to use a spray version of a glossy protective coat but that came out splotchy too. Moral of the story, glossy spray paint over a large surface just doesn’t come out right. I already knew that but I’m lazy and wanted to try it anyway. I never learn.

I even tried the spray stuff on the top off the desk because I wanted the laminate to shine like polished wood. Even with sanding in between coats, it was still splotch city.
Another trip to the hardware store and a lot of label reading led me to get this stuff.
 |
| Here I come to save the daaay! |
I picked this stuff because it is safe to use on painted surfaces. It helps gives you an even finish and adds a protective top coat to your project. A definite necessity for a hard working desk! The label recommends three thin, even coats of poly with a light sanding (use 220 grit) in between coats.

Each coat went on quickly so I was able to slap one on after work, before it got too dark. You only need to allow a few hours of drying time between each coat but I waited 24 hours because I have to sleep sometime. Allegedly. Everyday, as I walked past it to my car (which was out in the friggin’ rain), I would stroke the shiny top and say, “Soon my love, soon,” in a deep and inappropriately husky voice. After an extra week outside, I was finally able to move this baby into the office.
Now, what you’ve all been anxiously awaiting, the after!
 |
| I'm smitten. |


I seriously grin every time I go into the office now. And I have so many supplies at my fingertips!
 |
| Wrapping paper used to line inside of drawers from Target. |
I have officially moved all of my stuff out of my former desk so Husband could make it his own. His new desk didn’t take nearly as long to set up. Lucky bastard.
Budget breakdown: (all supplies from Lowe’s)
Desk - $20
Paint - $30 for six cans (Primer, people. Primer.)
Touch up pen – on hand
Sanding block - $5
Brushes and rags – on hand
Grand total - $55
I did a little research online after I completed this project and, wouldn’t you know it, I found a desk almost EXACTLY like mine for sale.
 |
| Google search results here. |
Cheapest cost online is $233 (without shipping) but some were as much as $550. That means I saved at minimum, hold on. . . getting my calculator/phone. . . carry the 2. . . $178!!* I totally squealed and then brushed my shoulders off when I saw that. Husband was also very grateful for my savings. He was originally skeptical of the desk but, as always, he said go for it.
If I had to do this project over again, I would have used roll on paint instead of spray, to avoid a splotchy finish. Even though the poly worked, it would have been one less step. It probably would have taken fewer coats of paint as well. If you try a similar project, either method could work though. I’m just such a sucker for spray paint. I can’t help it.
 |
| They fear I will spray paint them next. Totally reasonable. |
So, what do you think of my savings? Have you ever had a blog make you want to get a new piece of furniture, whether you needed it or not? Yeah, happens to me all the time.
*This amount, combined with my Dumpster Desk Chair savings, means I saved a total of $295 for my new workspace. I saved more money than I spent. Holy thrifting, Batman!


Cool desk transformation! I love reading your posts!!!
ReplyDeleteIf you love spray paint.....you should be working where I work. At a spray paint factory. Employee discount. Cases of paint roll past my office on a conveyor all day long. Seriously. Are you jealous, yet?
P.S. I'm hoping you can resist the urge to paint the pets ;)
Very chic with the shining metal legs , wooden top and all white!
ReplyDeleteI see desks and dressers at garage sales and walk right on by. Too old, too beat up, too dirty.... but you, you can see ahead to a re-finished product. Kudos! Great re-do! I'm going to follow you to see what you are going to re-do next!
ReplyDeleteBest,
Rikka J.
Ricochet and Away!
@Dee
ReplyDeleteThank you!
@Ricochet
ReplyDeleteThanks so much for the follow and for the great comment! I hope I don't disappoint with future projects!
Great idea! Love the chair too. Thanks for linking up with Lemon Tree Creations today!
ReplyDeleteThis desk and chair look amazing! Great work!
ReplyDelete@Amanda Jones
ReplyDeleteWhy thank you!
Did you take the handles off?
ReplyDeleteI just redid two filing cabinets. It's easier if you can take off the hardware like handles and locks and stuff. I couldn't take off my lock easily so I taped it. It was, to me, more of a hassle than unscrewing it like I did the handles.
Delete