Closet Tweaking

I love my closet organizational system. As organized as I’m able to keep my closet, it still requires the occasional purging and modifications. Especially with my shopping habit.

My mom and I shop as part of our bonding. We both love to use coupons and find good deals. My sister once said we turn shopping at the mall into a blood sport. Our shopping excursions are not for the faint of heart. Because of this hobby, I have to have a pretty strict “One In One Out” rule. However, I hadn't really been following my own rule lately. I just bought more hangers instead of dealing with the problem. Did I mention I had clothes hanging above my dryer that I forgot existed? *hangs head in shame*

It was time to be ruthless. I did this project right after Laundry Day and gathered the long lost clothes that were above the dryer. I wanted to have all of my clothes in one spot so I could get a feel for how much I had and how much I could actually fit in my closet. This gave me a better idea of how much I should get rid of and if I had any duplicates.


It took me about 20 minutes to purge these clothes. If there was any question, into the donate pile it went. I also went through my accessories, which I rarely do. Here’s the nitty gritty of what didn’t make the cut:

  • 3 pairs of shorts
  • 2 pairs of jeans
  • 10 tops
  • 1 sweater
  • 3 dresses
  • 1 tank top
  • 1 jacket
  • 4 necklaces
  • 2 pairs of earrings
  • 2 bracelets

After my clean out session, I organized my clothes by color and refolded the mess of shirts.


Look! Space! This closet system was a gift from my mom on my birthday. I know it may not seem like the most exciting gift ever (Mom seemed surprised when I asked for it) but trust me, it’s been awesome. I mean, look at it!

We picked up this system from Target. It consists of one 2 door cabinet, and two vertical organizers on top. I also grabbed a closet extender from Bed Bath & Beyond for $20 (can't find it online) to give myself more hanging space. I stacked the cabinets in the center of the closet to divide the space. Pants and tops on one side, dresses on the other. As you can see, I keep folded clothes in the open cubbies, divided by type. PJs and undies are concealed behind closed doors. That stuff could be embarrassing if left in the open. I also have a bin that was a gift from a friend on the floor, under my dresses. I put clothes I intend to get rid of in there, so there's no excuse really.

Here's a closer look at the top of the closet.


The top two cubbies contain my makeup and some of my jewelry on a small tray I painted blue.

On top of the cabinets, I have all of my hair products and tools in a garden tool organizer I received as a free gift for donating to charity. This makes it easy to grab what I need to style my hair and then store it away when I’m done, leaving my countertop free of clutter. It’s a small countertop, so it couldn’t hold much.

 Saving nature and keeping my hair looking fabulous? Definition of winning! Someone tell Charlie.


True says, "Save the trees, man."

The canvas bins on the very top shelf are from Wal-Mart, available here. They hold my small clutches, belts, scarves, and hats. I keep my purses stored in the two larger bags you see in the upper left corner.

I plan on taking my large pile of clothes to Plato’s Closet to (hopefully) make a few dollars. Whatever doesn’t sell goes straight to Goodwill. It feels good to have a little extra breathing room. I also feel like I have a new wardrobe because I rediscovered some items. I have dresses! Yay!


0

YHL Art

Anyone who has been reading DIY or home design blogs for, oh 5 minutes, has read John & Sherry’s blog, younghouselove. If you haven’t, go there now! Seriously, I’ll wait.

Did you come back? It’s ok. I don’t blame you if you don’t. Their blog is awesome.

Anywhosit, awhile back, Sherry DIY’d some art (seen here) she had seen on Pinterest. Here’s a pic!


She decided she wanted a more “tone-on-tone” look and went over some of the darker colors with a lighter shade of paint. Here’s her final result.


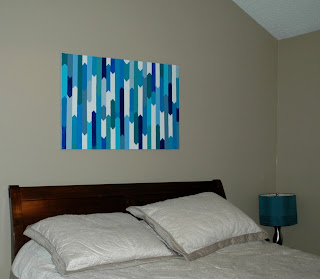
Immediately after seeing the first pic, I knew this would look great in our bedroom in the big blank space above our bed. Our color scheme for the bedroom is various shades of blue. This was the perfect way to bring all of those colors together, much like my paint chip art did for the office.

This room is still a major work in progress.

Husband and I have major issues with this wall. One problem we’ve had is that the bed isn’t centered on the wall, specifically under the ceiling beam. This always caused us a dilemma. Do we hang art centered with the ceiling or centered with the bed? I made an executive decision (Mark your calendars! That almost never happens!) to use the bed as the center. My reasoning is that the bed is the focal point of the room. If you’re wondering why we don’t just center the bed under the ceiling beam, it’s because Husband wouldn’t be able to get to his closet. He’s skinny but that’s pushing it.

Another issue with art in the bedroom is size. The high ceilings made everything we tried above the bed look too small. Do you know how much large art pieces cost?!? More than my cheapo self is willing to pay!

Husband and I are indecisive when it comes to art and we change our minds a lot. Just ask our friend Big Wes when he tried to help us hang some art in our living room, which also took years to finally do. Then, ask our friend Trevor when we changed our minds a few months later and he helped us hang a large mirror instead. We changed it ourselves the third time, so we could preserve our friendships. Don’t tell Husband, but I want to change it again. (Just one piece, Honey! Not the whole thing! Promise!)

So, Husband and I never like to spend much on wall art because we may dislike it in a month or so. Don’t worry. I keep everything we buy because we will probably like it again in another 6 months. Fickle much?

Where was I? O yes. Sherry’s art. Sherry’s painting was pretty easy to duplicate because of her simple instructions. And I could buy the materials for cheap. Perfect. I just had to wait for large canvas to go on sale.

Michael’s had large canvas at 50% off so this canvas cost $20. 

The paints were also on sale, two for a dollar.


Once I had my materials, I just followed Sherry’s easy peasy instructions.

1. Use a ruler (or measuring tape, in my case) to draw some vertical lines. I used to the width of the ruler to evenly space my lines.


2. I used a sticky note pad to make the little arrow shapes, as I called them.


3. Then, the time consuming part. Painting your arrows. It isn’t hard and there’s no right or wrong way. I would just randomly paint one color in a few spots, and then switch to another color and paint that in a few spots, etc. etc., so that I could have the colors spread fairly even. I mixed some white paint with each of my colors to give myself more color options, without having to buy twenty tubes of paint.


Mixing my colors.

I spent about a couple of hours a week for maaaaannnnny weeks. You could knock this project out in a few days but I couldn’t dedicate more than a small chunk of time a week. It was kind of Zen like though. Just to paint. And all I had to concentrate on was staying in the lines. Easy enough!

Now, I promise I wasn’t trying to be exactly like Sherry. I really did prefer the high contrast version of her painting. But . . . I didn’t like the dark green and the dark blue together. They were sort of . . . . competing. I decided to nix the dark green for a lighter teal shade so that meant painting over some colors just like Sherry. Sorry Sherry, I didn’t mean to completely jack your style. I had only intended to kind of jack your style. *like she reads this little blog*

4. Finally, I painted the sides of the canvas a light blue gray (also in the painting) to give it a finished look and to cover up any drips.

I also touched up any white spots.


5. Once it dried, I used Velcro strips to hang our new art centered above the bed. No holes, Husband! Aren’t your proud?

This room still needs a lot of work. On the list, new nightstands that are tall enough for our bed, matching lamps, and probably more artwork.


Budget breakdown.

Canvas - $20
Paints - $2.50
Pencil, notecard, and ruler – on hand

Total - $22.50

So, what do you think? Not bad for an art novice, such as myself? I love that this project didn’t cost a lot of moolah, so it won’t hurt our wallets if we change our minds. To be honest, this will have hang somewhere in this house. I spent too much time on it to keep it in a closet!

I think this project would also look really cool in other colors, like grays with pops of pink for a modern tween girl’s room. What colors would you try?
6
Back to Top